Recipes

Good to the Last Lick!

With June we have hope that summer is on its way; which for us in the Pacific Northwest could mean warm weather and cool summer treats.  It could also mean cool weather and warm comfort food, but we won’t dwell on that!  June brings graduations, weddings and yes, Father’s Day.

It is with the promise of summer, Father’s Day and my Dad that I’ve chosen this recipe.  My Dad loved ice cream, so this month I’m sharing one of my favorite vanilla ice cream recipes in his honor.  Dad liked his ice cream in a shallow dish so he could lick the bowl clean (so cute!), and I have fond memories of him doing that all my life.  He also loved ice cream cones. Every time I would present him with one, he would exclaim “Oh my!” (again, so cute!).  Dad passed away last October, and I think of him so often; especially when making ice cream. 

There are so many variations of vanilla recipes in all the frozen categories: gelato, frozen custard, ice and more!  This recipe is a very slight variation of Alton Brown’s Serious Vanilla Ice Cream recipe, and it’s my go-to vanilla.  It’s egg-free, which makes it quick to put together, but I promise, it does not skimp on flavor!  Peach jam or preserves is called for. It adds little, if any additional flavor, but is included because of the pectin which provides just a bit of smoothness to the texture.  I suppose you could leave it out, but I never have.

 “This is for you, Dad, with love!”

-Christine

Ice Cream Collage.jpg

Vanilla Ice Cream

Ingredients:

2 c. Half and Half

2 c. Heavy Cream

1 Vanilla Bean, split and seeds scraped out

1 c. Granulated Sugar

2 T. Peach Jam/Preserves, NOT jelly

Directions:

  1. Combine all ingredients (including the bean and its seeds) in a medium-large saucepan and place over medium heat.

  2. Stirring occasionally, bring the mixture to 170 degrees F., using a digital read, candy or frying thermometer. (If you don’t have a thermometer heat until just simmering.  Do not bring to a boil.)

  3. Remove from heat and cool until no longer steaming. 

  4. Remove the vanilla bean, cover and refrigerate six hours to overnight.

  5. Place a quart-size container, with a lid, in the freezer so it’s cold and ready when its time to harden the ice cream.

  6. Churn and freeze mixture in an ice cream maker or ice cream bowl,  according to the manufacturer’s instructions, until the volume has at least doubled and is at the “soft serve” consistency.

  7. Transfer frozen mixture to the pre-chilled container, cover and freeze to allow to harden; one+ hours.

 Enjoy!

It’s Not Italian Jello!

Ever heard of the Soup Nazi from the Seinfeld episode?  Did you know there was also a Dessert Nazi?  Yep, that’s what some of my friends and co-workers called me behind my back, some years ago when I worked at a local restaurant.  It came as a shock to me that my attention to detail and…um…perfectionism...translated into that nickname.  Not what I was going for.

One night I was at said restaurant with a group of my friends and the busboy (poor, dear) was tasked with presenting our table with the dessert tray offerings.  The desserts that I had made.  Moi, the Dessert Nazi.

When he came to describing the creamy, delightful Panna Cotta he said, “It’s like Italian Jello”.  You could have heard a pin drop.  Would he live to tell the tale? ...and then, you should have heard my friends laugh!

If you haven’t experienced panna cotta yet, here’s your chance.  Italian for “cooked cream”, panna cotta is a simple, yet, oh-so-satisfying custard cooked on the stovetop without eggs.  It uses gelatin to allow it to set. (Still no excuse for the young lad.)  One of the things I love about cream is how versatile it is and how its flavor and composition change after its heated.  *sigh*

PannaCotta-Mom1 (2).jpg

There are endless flavor options for panna cotta but this, purist’s favorite, vanilla bean panna cotta recipe is great for beginners. It’s perfect for serving to a group who might have different flavor preferences because you can top it with just about anything you’d like.  I chose lemon curd, fresh strawberries, chocolate sauce, Bailey’s, apricot preserves, fresh blueberries, sour cherries…you get the idea. 

If you’d like to treat mom, or yourself, this weekend and need a quick idea, then give this a try.  Just allow yourself time for the gelatin to set!

Enjoy!

 ~Christine

Panna Cotta

Skill Level: Beginner

Servings: 5-6

Ingredients:

1/4c cold water, in a heat resistant cup or bowl

1 envelope (2 ½ t) unflavored gelatin

3 c heavy cream

½ sugar

½ vanilla bean, split and seeds scraped out

Toppings and garnish of your choice

Instructions:

  1. Spray teacups, ramekins, or parfait glasses lightly with oil spray, set aside on a tray for easy handling.

  2. Sprinkle gelatin over cold water. Set aside and allow water to absorb gelatin (“blooming”).

  3. In a medium sized pot, combine cream, sugar, vanilla seeds, and bean and bring just to scalding point over medium high heat while stirring constantly. Remove from heat.

  4. Heat bloomed gelatin in microwave or over low heat just until melted.  Add to heated cream mixture; mix well.  Pour mixture through a fine sieve into bowl or heat proof pitcher to strain out any lumps and vanilla bean.

  5. Pour into prepared cups and refrigerate uncovered until no longer steaming.  Cover loosely with plastic wrap and chill until set; 4 hours-overnight.

  6. Serve topped with desired fruit, sauces, preserves or liquor.

 Enjoy!   


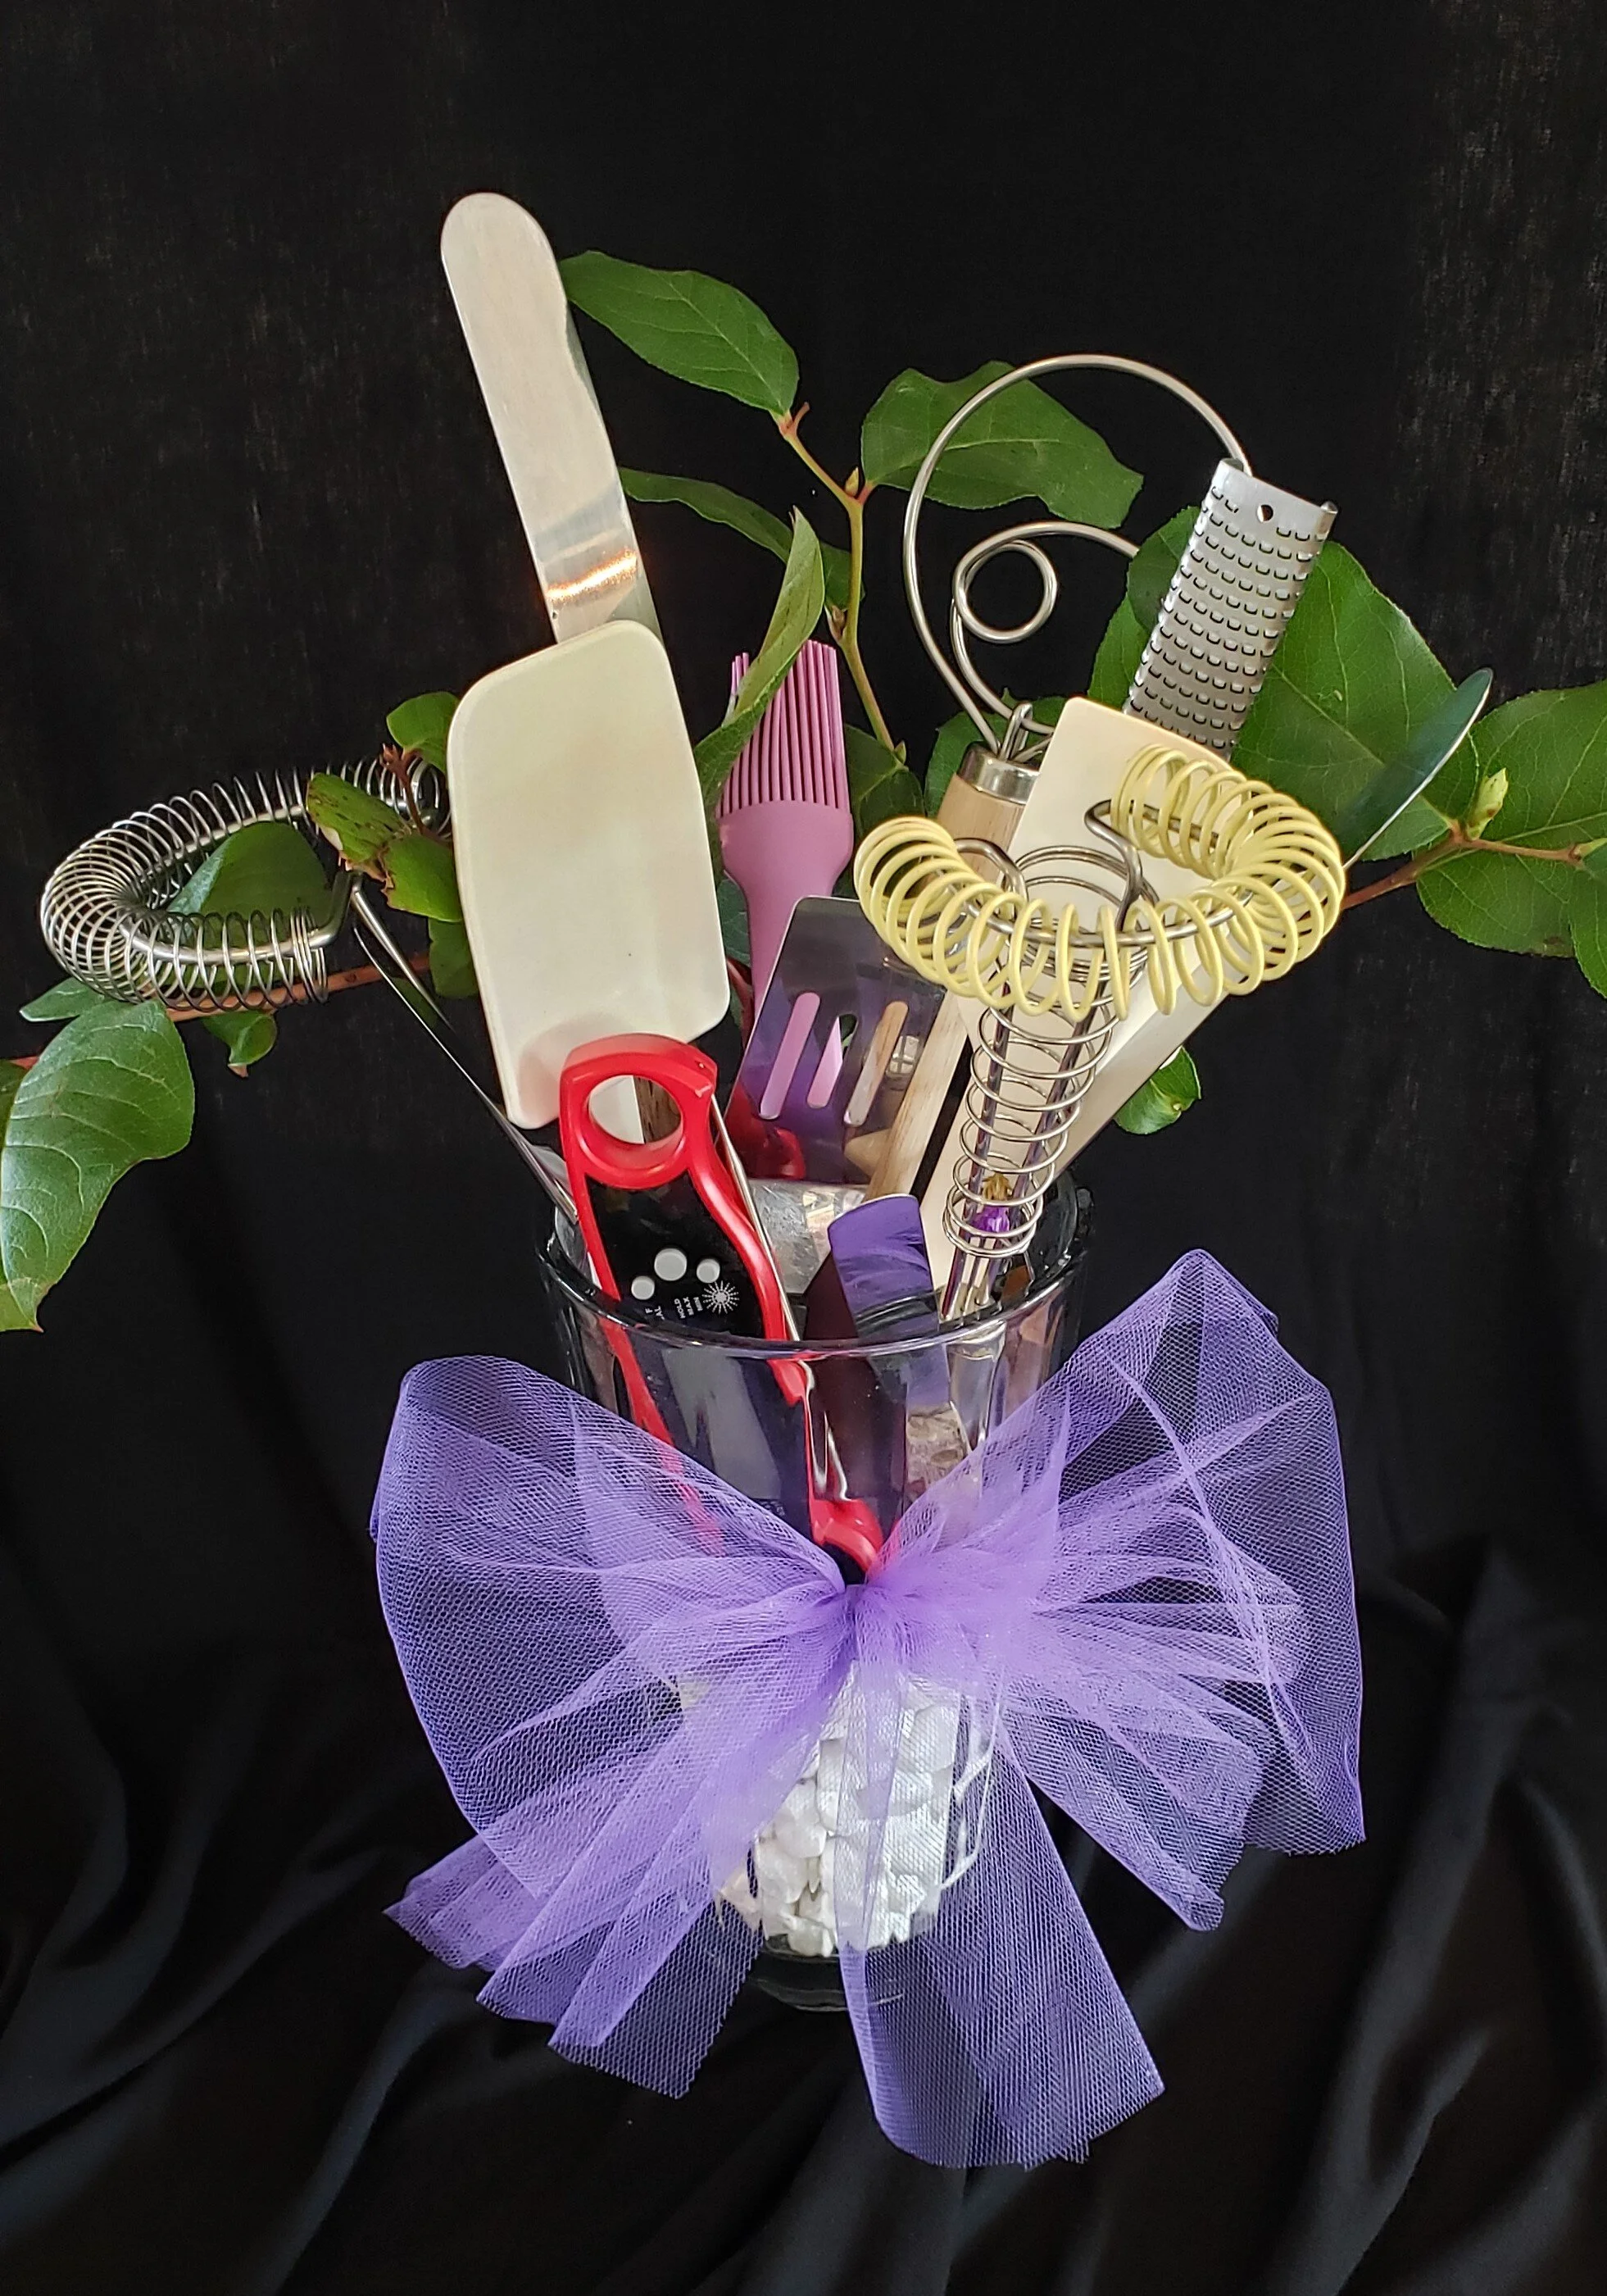
Still looking for a perfect gift for your baking inspired mom?

Try one of Chris’s favorite kitchen tools!

  1. Assorted Swedish Style Whisks

  2. Offset Spatulas

  3. Silicone Spatulas - WithOUT wooden handles

  4. Silicone Pastry Brush

  5. Microplane Grater & Zester

  6. Danish Dough Whisk

  7. Digital Instant Read Thermometer

  8. Small Offset Serving Spatula

Spring Has Sprung - Baking Blog Debut

Easter Tiramisu.jpg

Ahh, tiramisu.  Such a beloved dessert with delicious regional variations.  My Easter “Tiramisu” was inspired by this classic dessert but definitely has a personality all its own.   

The first major difference you’ll notice is the lack of ladyfinger cookies.  Early on, whenever I’ve made tiramisu, I’ve baked a sponge cake instead of using the traditional ladyfinger cookies.  This is just my personal preference because I’ve never cared for the texture of these delicate cookies after they’re soaked, and I’ve carried that preference over into this dessert as well.   

This recipe came about several years ago while I was living in the Portland, Oregon area and invited a dear Australian friend of mine for Easter dinner.  We decided on an Aussie favorite of roast lamb and veg meal and I wanted to serve something special but not too heavy for dessert.  Tiramisu came to mind but I associate it more with the fall and winter months, for some reason, so that wasn’t quite the right fit.  Its creamy filling is a hit all year round, however, so I got to wondering what else I could make using that filling, and this is what evolved.

Instead of soaking my sponge cake with a rich coffee mixture I used a sweet but light Moscato.  I added some fresh fruit to the layers and brightened up that luscious cream filling with lemon zest and the result was a new spin on an old favorite, perfect for spring, summer…and Easter dinner!  I hope you and yours like it as much as we did!

 ~Christine

Easter "Tiramisu"

Skill level: Intermediate                                           

Servings: 12

Oven Temp: 350*

Tips: Bake sponge cake the day before assembly for easier slicing and better absorption of soaking beverage. Great make-ahead dessert as it will need 6-8 hours to set in the fridge. 

Soaking Beverage:

2 c. Moscato (sparkling or still) OR substitute ginger ale or limeade

Fruit for layering:

2-3 c.  Your choice of assorted fruit; berries, sliced peaches, pear, kiwi, etc.       

Sponge Cake:

6 large eggs, room temp.

1 c. sugar

1 t. vanilla

Zest of 2 limes

¼ t. salt

1 ½ c. AP flour

Instructions:

  1. Spray/grease 9” springform pan, line bottom with parchment paper, spray/grease again and dust with flour.  Set aside.

  2. Sift flour and salt into medium bowl. Set aside.  Preheat oven to 350*.

  3. Beat eggs in bowl of stand mixer with whisk attachment until foamy. Add sugar gradually, in stages, and beat until mixture is pale yellow and reaches “ribbon stage”.  Add vanilla and lime zest.

  4. Scrape and remove whisk attachment and carefully fold in flour until incorporated.  Do not over mix.   

  5. Spread evenly in prepared pan.  Bake for approx. 25 minutes or until golden brown. Leave to cool in the pan while preparing cream filling. (OR: cover with plastic wrap, store at room temperature overnight.  Prepare cream filling and assemble the next day.)

Cream filling:                                   

1 packet (2 ½ t) unflavored gelatin                                           

1/8 c. water, room temp.                                                          

6 egg yolks

½ c.

3 c. mascarpone, room temp                                                 

1 ½ c. whipping cream, whipped                                                            

Zest of 2 large lemons

Instructions:

  1. Pour water into heat resistant bowl, sprinkle gelatin over water.  Set aside to “bloom”.

  2. Whisk yolks and sugar in heat resistant bowl over Bain Marie, continue whisking until thick, pale and sugar is dissolved.

  3. Melt gelatin, cool slightly and stir into egg mixture.

  4. Whisk in mascarpone, one cup at a time until smooth. 

  5. Fold in whipped cream and lemon zest.

Assembly: 

Slice cooled cake into two layers.  Place the bottom layer into a clean springform pan lined with parchment paper. Soak bottom layer with half the Moscato until moist but not seeping.  Evenly spread bottom layer with half the cream mixture. Evenly arrange half the fruit onto the cream layer, gently pressing fruit into the cream.

Repeat with second layer of cake; soaking with remaining Moscato until evenly moist but not seeping, spreading with remaining cream mixture, and decoratively arranging remaining fruit on top, as desired.

Cover loosely with plastic wrap and chill for 6 hours or overnight.

Slide a long narrow knife around inside edge of springform to loosen edges before releasing pan.

Transfer to a serving platter or cake stand. Sprinkle with powdered sugar before slicing, if desired.